How to Read a 3 Pointer Altimeter

How to Read a 3 Pointer Altimeter

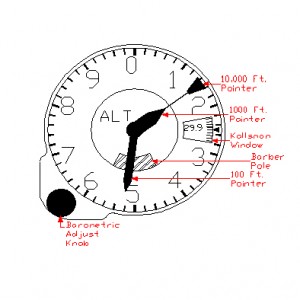
A three-pointer altimeter, as its name implies, has three different pointers on the front dial. They are the 100-foot pointer, the 1000-foot pointer, and the 10,000-foot pointer. The medium length pointer is the 100-foot pointer, the shortest pointer is the 1000-foot pointer, and the longest pointer is the 10,000-foot pointer. The altimeter dial has 10 major indices numbered 0 through 9. In between each major indice are 4 minor indices. The value of these indices is dependent on the pointer being read. When reading the 100-foot pointer each minor indice equals 20 feet, each major indice equals 100 feet. When reading the 1000-foot pointer each minor indice is equal to 200 feet, each major indice is equal to 1000 feet. When reading the 10,000-foot pointer each minor indice is equal to 2000 feet, each major indice is equal to 10,000 feet. The altimeter in figure 1 is indicating 11,520 feet and is read as follows:


The 10,000 foot pointer is past the 1 and not yet up to the

2 and so it is read as:                                                           1 x 10,000 = 10,000 +

The 1,000 foot pointer is past the 1 and not yet up to the

2 and so it is read as:                                                           1 x 1,000 = 1,000 +

The 100-foot pointer is 1 minor indice past the 5 and so

Therefore, it is read as:                                                        5.2 x 100 = 520

The indicated altitude is the sum of the pointers:                        11,520

barber_pole

Figure 1: Three-Pointer Altimeter

Getting to know your Kollsman Window and Barber Pole

Getting to know your Kollsman Window and Barber Pole


 Reading the Kollsman Window ( Barometric Reading)

The Kollsman window is located at the 3 o’clock position on the altimeter dial. This window allows access to read a sub-dial, which contains the barometric readings. The arrowhead indice located precisely at the 3 o’clock position on the altimeter’s main dial is used as the reference point for reading the barometric sub-dial. Most altimeters will have a sub-dial, which covers the readings from 28.1 InHg (inches of mercury) to 31.0 InHg. On the sub-dial each major indice is read as 0.1 InHg, each minor indice is read as 0.02 InHg.

The Altimeter in Figure 1 reads 29.92 InHg


As previously, stated, weather conditions will greatly affect the pressure of the atmosphere (the barometric reading). Altimeters report altitude as a function of atmospheric pressure. Typically pilots will obtain a local barometric reading from the nearest airport. They will then set the Kollsman window to the setting that they received. This action will adjust the altimeter reading, eliminating error due to local weather conditions.

Some altimeters will have a Kollsman Window, which reads out in milli-bars in lieu of InHg. These are usually altimeters designated for use in Europe. However use of milli-bars has become more common in the U.S. during the last few years. Milli-Bars is just another unit of measurement, 1013.2 milli-bars = 29.92 InHg.


The Barber Pole

The “Barber Pole” on the face of the altimeter is visible only when the altitude is above sea level. When the altitude is below sea level the barber pole is no longer visible. This is provided to avoid the error of reading –1,000 Ft. as being +10,000 Ft.

barber_pole

Altimeters Major Components

Altimeters Major Components


The major components of the altimeter are:

  1. Case
  2. Aneroid and Mechanical Linkage Assembly
  3. Dial and Pointer Assembly
  4. Barometric Dial and Setting Assembly


Case

A standard altimeter for general aviation comes in a 31/8” diameter case. This is a standard size case for most general aviation indicators. It is important that the altimeter case be airtight as the case contains the static pressure input. A leaky case will cause the indicator to give erroneous readings. There is one pressure input on the back of the case. This input is the “STATIC PRESSURE” input and is connected directly to the static port on the aircraft, which is exposed to the outside atmosphere.


Aneroid and Mechanical Linkage Assembly

An aneroid is essentially a balloon made of very thin metal. Typical metals used for this purpose are copper or brass. The aneroid, when first manufactured is sealed at precisely 29.92 InHg that is the standard atmospheric pressure for a standard day at sea level. Because the aneroid is sealed at this specific pressure, any change in the pressure surrounding it will cause it to either expand or contract in a manner which is directly proportional to the change in the surrounding pressure. This expansion and contraction are relayed to the pointer via the mechanical linkage assembly. It is important to note that the aneroid is extremely delicate. Very fast changes in altitude can and will damage the aneroid.

The Mechanical Linkage Assembly is comprised of a link, several types of gears, glass jewels, pivots, a hairspring and a bimetal assembly.

The link directly connects the aneroid to the gears. The gears transfer the aneroid movement to the pointer. The glass jewels are bushings for the gear pivots to ride in. Pivots are the axles for the gears. The hairspring assembly provides an anti backlash function for the gears helping to eliminate hysteresis errors. The bimetal assembly provides the function of correcting for temperature changes.


Dial and Pointer Assembly

The dial and pointer assembly contains the read out information for the pilot. A typical three-pointer altimeter has, as the name would imply, three pointers. These are connected to the aneroid via the gears. There is also a main dial with major indices numbered 0 thru 9. The 0 indice is located at the 12 o’clock position on the dial. The numbers 1 thru 9 are then linearly distributed around the dial face. Each main indice is subdivided by 4 minor indices, which are equally spaced.


Barometric Dial and Setting Assembly

Behind the main dial is a sub-dial. The sub-dial is viewable at the 3 o’clock position on the main dial. This opening is called the “Kollsman Window”. The reading in the Kollsman Window is settable via the barometric adjust knob which is located, on modern altimeters, in the 7 o’clock position of the instrument face.

Older altimeters will have the barometric adjust knob located at the 6 o’clock position.


Understanding Altimeters

Understanding Altimeters


In its purest form, an altimeter is simply an absolute pressure gauge. This means that it is displaying the pressure being exerted by the atmosphere at its current location.

The earth is surrounded by an atmosphere. This atmosphere is the air that we breathe. The atmosphere is held in place by the earth’s gravity. The atmosphere has a specific weight. The weight of the atmosphere is approximately 14 pounds of weight for every square inch of earth when measured at sea level on an average day.

An accurate method of measuring this weight is to use a barometer. A barometer is a reservoir filled with mercury. The reservoir has two openings; one opening is exposed to the atmosphere and the other empties into a glass tube. The atmosphere pushes down on the mercury within the reservoir causing the mercury to fill up the glass tube. How far the mercury goes up into the glass tube is directly proportional to the weight of the atmosphere pushing it. This is why barometric pressure is normally expressed in terms of “Inches of Mercury (InHg)”.

At sea level, on an average day, the barometric pressure is 29.92 InHg. However, this will vary constantly depending on the weather. Stormy weather tends to pull the atmosphere away from the earth’s surface causing lower pressure. Hot, dry weather pushes the atmosphere down causing higher pressure.

The weight of the atmosphere also changes depending on altitude. The closer to sea level that you are, the more air there will be, consequently the atmosphere will weigh more. As you go higher in altitude, the less dense the atmosphere will be, therefore less weight or pressure is exerted. An altimeter measures this change in atmospheric weight as expressed in terms of pressure or feet of altitude.


All About Altimeters

All About Altimeters


General Information

The altimeter provides the basic function of indicating to the pilot the altitude of the aircraft above mean (average) sea level (MSL).  The indicator is normally a 31/8” size dial face with multiple pointers or a combination of pointers and counter drum. Location of this indicator is typically in the top row of instruments near the center of the instrument panel. In a standard “T” configuration panel the altimeter is just to the right of the attitude gyroscope.


Types of Altimeters

The various types of altimeters include:

  1. Three pointer altimeter
  2. Counter Drum Altimeter
  3. Encoding Altimeter

Typical altimeter ranges are:

  1. –1000 Ft. to +20,000 Ft.
  2. –1000 Ft. to +35,000 Ft.
  3. –1000 Ft. to +50,000 Ft.
  4. –1000 Ft. to +80,000 Ft.


Most general aviation altimeters will fall into the first two ranges. Ranges above 35,000 Ft. are typically corporate jets, commercial aircraft, and military aircraft.


Three Pointer Altimeter

The three-pointer altimeter is the most common type of instrument used in general aviation. It is named as such because it utilizes three pointers in order to display the current altitude. One pointer is used to display 100 Ft. increments. A second pointer is used to display 1000 Ft. increments and the third pointer displays 10,000 Ft. increments. The Technical Information Section of this document provides instructions on how to properly read a three-pointer altimeter.


Counter Drum Altimeter

The counter-drum altimeter is named as such because it displays altitude utilizing a single pointer and a rotating drum that displays digits. The drum displays ten thousand and one thousand foot increments. The pointer displays from 0 to 999 feet.


Encoding Altimeter

An encoding altimeter can be of either the three-pointer or counter drum type of altimeter with an encoding module built into it. The encoding module takes the altitude information and converts that data into a digital code. This code is then sent via a set of wires to the aircraft transponder. A transponder is a radio device that reports the aircraft altitude to ground control radar.


Blind Encoder

The blind encoder is a very special type of altimeter. This unit has no dial or read out that is visible to the user. It has only an electronic output to the aircraft transponder. The use of a standard altimeter in conjunction with a blind encoder is often more economical than purchasing an encoding altimeter.


Photo Lineup